Battery switch on travel trailer function is crucial for managing your RV’s power. This guide dives into the ins and outs of these switches, covering different types, wiring, troubleshooting, and maintenance. We’ll explore how they connect to your trailer’s electrical system, helping you understand how to safely switch between house and chassis batteries and avoid common problems. Get ready to become a power management pro!
We’ll cover everything from basic functionality and wiring diagrams to advanced troubleshooting techniques and preventative maintenance. Understanding your battery switch is key to preventing frustrating power outages and ensuring a smooth and enjoyable RV experience. Whether you’re a seasoned RVer or a newbie, this guide will empower you to confidently handle your trailer’s electrical system.
Understanding Battery Switch Functionality in Travel Trailers
Properly managing your travel trailer’s batteries is crucial for a successful trip. A battery switch is the key component controlling the flow of power from your batteries to your trailer’s electrical system. Understanding its function and the different types available will ensure you’re prepared for any situation on the road.
Types of Battery Switches
Travel trailers typically utilize one of three main types of battery switches: a simple on/off switch, a dual-battery switch, and a battery isolator. A simple on/off switch is the most basic, allowing you to connect or disconnect your battery from the trailer’s system. A dual-battery switch allows you to select between two batteries, or to combine their power.
A battery isolator automatically switches between batteries and charges them independently, preventing one from draining the other.
Typical Wiring Diagrams for Battery Switch Systems
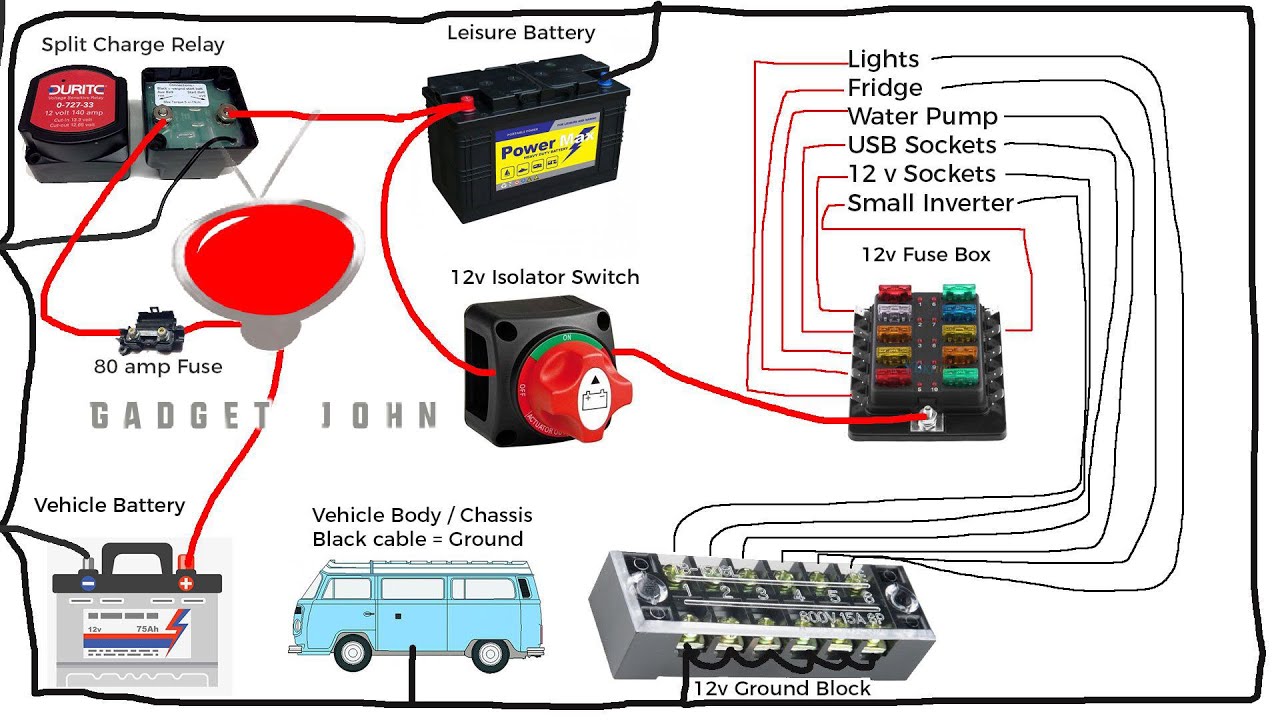
A simple on/off switch typically involves a single wire running from the battery’s positive terminal, through the switch, and then to the trailer’s distribution panel. The negative terminal is usually directly connected to the chassis. A dual-battery switch adds another wire from a second battery, allowing the switch to select either battery or both. A battery isolator’s wiring is more complex, involving relays and diodes to manage charging and power distribution automatically, often integrating with a charging system.
These diagrams can vary depending on the specific components and the trailer’s setup. A schematic would show the power flow from the battery(ies), through the switch (or isolator), to the distribution panel and then to the trailer’s appliances.
Connecting a Battery to a Travel Trailer’s Electrical System
Before starting, always disconnect the negative terminal of your existing battery to prevent accidental short circuits. First, identify the positive and negative terminals on both your battery and your trailer’s battery wiring harness. Then, securely connect the positive cable from the battery to the positive terminal on the switch or isolator. Repeat this for the negative cable. Ensure all connections are tight and corrosion-free.
After connecting the battery to the switch or isolator, double-check all connections for tightness and proper polarity before reconnecting the negative terminal of the existing battery. Finally, test the system by turning on various appliances in your trailer to ensure power is flowing correctly.
Comparison of Battery Switch Types, Battery switch on travel trailer function
| Feature | Simple On/Off Switch | Dual Battery Switch | Battery Isolator |
|---|---|---|---|
| Cost | Low | Medium | High |
| Complexity | Low | Medium | High |
| Functionality | Basic on/off control | Selection between two batteries or combined power | Automatic switching and independent charging |
| Maintenance | Low | Low | Medium (relay/diode checks) |
Battery Switch Operation and Troubleshooting
Operating your travel trailer’s battery switch is crucial for managing power and preventing battery drain. Understanding how it works and troubleshooting potential problems will keep your RV running smoothly. This section details the switch operation, common issues, solutions, and important safety measures.
Switching Between House and Chassis Batteries
The process of switching between your travel trailer’s house and chassis batteries depends on the type of switch you have. Most commonly, you’ll find a multi-position switch offering options like “off,” “house,” “chassis,” and “both.” To switch to house batteries (powering your interior lights, appliances, etc.), simply rotate the switch to the “house” position. To use the chassis battery (for starting your tow vehicle), select “chassis.” The “both” position connects both battery banks, ideal for charging both simultaneously or when high power demands exist.
Always consult your RV’s manual for specific instructions related to your model’s battery switch. Improper operation could damage your batteries or electrical system.
Common Battery Switch Problems and Solutions
Several issues can arise with battery switches. A common problem is a switch that fails to engage correctly, preventing power from reaching the intended battery bank. This could be due to a corroded switch, loose connections, or a faulty switch itself. Inspect the switch and its connections for corrosion; clean them thoroughly with a wire brush and baking soda solution.
If corrosion is extensive or the switch is physically damaged, replacement is necessary. Another common issue is a constantly drained battery bank, even when the switch is off. This might indicate a parasitic drain somewhere in the electrical system. A multimeter can help pinpoint the source of this drain by measuring current draw with the switch off. If a significant drain is detected, systematically disconnect components until the drain disappears to isolate the faulty circuit.
Finally, switches can simply fail due to age or wear and tear; a simple replacement usually resolves this.
Safety Precautions When Working with Travel Trailer Batteries and Switches
Working with batteries involves risks. Always wear safety glasses to protect your eyes from potential acid splashes. Batteries produce hydrogen gas, which is flammable; ensure good ventilation when working near them. Never short-circuit the battery terminals, as this can cause sparks and potentially damage the battery or create a fire hazard. Before working on any electrical components, disconnect the negative (-) terminal first, and reconnect it last to prevent accidental short circuits.
When disconnecting the battery, use insulated tools to avoid shocks. If you are unsure about any step, consult a qualified RV technician.
Troubleshooting a Malfunctioning Battery Switch
This flowchart Artikels the steps to troubleshoot a malfunctioning battery switch:[Imagine a flowchart here. The flowchart would begin with a box labeled “Battery Switch Malfunction?” A “Yes” branch would lead to a box asking “Is the switch physically damaged or corroded?” A “Yes” answer leads to a box indicating “Clean or replace the switch.” A “No” answer leads to a box asking “Are the connections secure and corrosion-free?” A “Yes” answer leads to a box asking “Is there a parasitic drain?” A “Yes” answer leads to a box indicating “Isolate and repair the parasitic drain.” A “No” answer leads to a box suggesting “Check fuses and circuit breakers.” A “No” answer from the initial “Is the switch physically damaged or corroded?” question leads to a box suggesting “Check wiring for breaks or shorts.” All paths ultimately lead to a box labeled “Test functionality.” A “No” from “Test functionality” loops back to earlier boxes, suggesting further investigation.]
Battery Switch and Electrical System Integration
Your travel trailer’s battery switch acts as the central control for your 12-volt DC power system. Understanding its role in the overall electrical system is crucial for safe and efficient operation. A properly functioning switch ensures power flows correctly to your appliances and lights, preventing issues like dead batteries and electrical malfunctions.The battery switch is the gatekeeper for power flowing from your trailer batteries to the various 12V DC components.
It directly impacts everything from your interior lights and water pump to the refrigerator and any other appliances running on your trailer’s battery system. If the switch is faulty, you might experience intermittent power loss, complete system failure, or even damage to sensitive electronics. For instance, a poorly connected switch could lead to a voltage drop, resulting in dim lights or a malfunctioning water pump.
Conversely, a switch that’s stuck in the “on” position could drain your batteries even when the trailer isn’t in use.
Impact of a Faulty Battery Switch on Different Systems
A malfunctioning battery switch can manifest in several ways depending on the nature of the fault. A switch that fails to connect properly might cause complete power loss to certain circuits or the entire 12V system. This would mean no lights, no water pump, and no operation of any battery-powered appliance. Conversely, a switch that remains closed even when it should be open could lead to a slow discharge of your batteries, leaving you with a dead battery when you need it most.
A partially functioning switch might cause intermittent power failures, making troubleshooting challenging.
Potential Causes for Low Battery Voltage
Low battery voltage is a common problem in travel trailers, and the battery switch can be a contributing factor. Several issues can cause this:
Several factors can contribute to low battery voltage. It’s important to systematically check each potential cause to pinpoint the problem.
- Faulty Battery Switch: A corroded, loose, or internally damaged switch can prevent proper power flow, leading to insufficient voltage.
- Bad Battery Connections: Loose or corroded connections at the battery terminals or at the switch itself can impede current flow.
- Parasitic Draw: A constant drain on the battery, even when the trailer is off, can deplete the battery over time. This might be caused by a faulty appliance or a short circuit somewhere in the wiring.
- Old or Damaged Batteries: Batteries naturally degrade over time and lose their capacity to hold a charge. This is a common cause of low voltage.
- Overuse of Appliances: Running high-draw appliances for extended periods without sufficient charging can deplete the battery.
Testing Battery Switch Functionality with a Multimeter
To test your battery switch, you’ll need a multimeter set to measure DC voltage.
Follow these steps to effectively check your battery switch’s functionality. Remember to always disconnect the negative battery terminal before starting any electrical testing.
- Safety First: Disconnect the negative battery terminal before beginning any testing.
- Set Multimeter: Set your multimeter to measure DC voltage (usually indicated by a “V” with a “-” symbol).
- Check Battery Voltage: Connect the multimeter probes to the positive (+) and negative (-) terminals of your battery. Note the voltage reading. A fully charged 12V battery should read around 12.6V.
- Check Switch Connection: With the switch in the “off” position, measure the voltage between the output terminals of the switch. There should be no voltage (or a very low voltage reading, close to 0V).
- Check Switch Operation: Turn the switch to the “on” position. Measure the voltage between the output terminals of the switch again. You should now see a voltage reading close to the battery voltage measured in step 3. A significant difference indicates a problem with the switch.
Note: If you don’t get the expected voltage readings, the switch may be faulty and require replacement or repair. Always consult a qualified technician if you are unsure about any of these steps.
So, you’re planning a trip? Awesome! Don’t forget travel insurance! Check out aon travel insurance for comprehensive coverage. They offer various plans, so you can find one that fits your needs and budget. Speaking of budgets, if you’re looking for a bit more budget-friendly option, you might want to also compare it with aon travel insurance – they sometimes have special deals.
Remember to read the fine print before committing to any policy, of course!
Maintenance and Replacement of Battery Switches
Keeping your travel trailer’s battery switch in good working order is crucial for reliable power. Regular maintenance prevents problems and ensures your batteries are protected and function optimally. Neglecting this can lead to premature battery failure, electrical issues, and potentially even dangerous situations.Routine maintenance is straightforward and can significantly extend the life of your battery switch.
Routine Maintenance of Battery Switches
Regular inspection is key to preventing problems. Look for signs of corrosion on the terminals, loose connections, or any damage to the switch itself. A visual check should be part of your pre-trip routine. Clean any corrosion with a wire brush and baking soda solution, ensuring you disconnect the battery before doing so. Tighten any loose connections.
If you notice any damage, replacement should be considered. This simple procedure can save you from more extensive repairs down the road.
Planning a trip? Don’t forget travel insurance! Seriously, it’s a lifesaver. Check out aon travel insurance for comprehensive coverage. They’ve got options for everything from lost luggage to medical emergencies. And if you’re feeling adventurous and hitting the trails, aon travel insurance might have a specific plan tailored for outdoor activities, giving you peace of mind while you explore.
Selecting a Replacement Battery Switch
Choosing the right replacement battery switch is important for safety and compatibility. Match the amperage rating of the new switch to the existing one or, if upgrading, ensure it handles the higher current draw of your system. Consider the type of switch; some offer additional features like battery monitoring or remote control. Check the physical dimensions to ensure it fits the existing mounting location.
Reputable brands typically offer better quality and longer lifespan. For example, a switch rated for 100 amps would be suitable for a typical travel trailer with a few appliances, while a 200-amp switch might be needed for larger trailers with numerous high-draw devices.
Safe Removal and Installation of a Battery Switch
Replacing a battery switch requires careful attention to safety. Always disconnect both positive and negative battery cables before starting any work. Use insulated tools to avoid accidental shorts. Note the wiring configuration before disconnecting any wires. Take photos or make a detailed diagram if necessary.
When installing the new switch, carefully match the wiring to your diagram or photos. Reconnect the battery cables after ensuring all connections are secure. Always test the switch’s operation after installation to verify proper functionality. Failure to disconnect the batteries before working on the switch could lead to serious injury from electric shock.
Battery Switch System Inspection and Maintenance Checklist
Before embarking on any trip, performing a quick inspection can prevent unexpected electrical issues.
- Visually inspect the battery switch for any signs of damage, corrosion, or loose connections.
- Check the battery terminals for corrosion and clean them if necessary (using baking soda and water).
- Tighten all connections to ensure a secure fit.
- Test the switch functionality by switching between battery banks and checking voltage at each battery.
- Inspect the wiring for any damage or fraying.
- Conduct a full system check of your trailer’s electrical system, including lights and appliances.
- If any issues are found, address them immediately before continuing use.
Battery Switch and Energy Management: Battery Switch On Travel Trailer Function
A battery switch is more than just an on/off switch for your travel trailer’s batteries; it’s a crucial component in effectively managing your power resources and extending the life of your batteries. Understanding its role in energy management is key to maximizing your off-grid adventures.Proper use of a battery switch allows for efficient energy management by isolating different battery banks (if present) and selectively powering specific circuits.
This prevents unnecessary drain on your house batteries when the trailer is stored or not in use, and it allows you to charge individual banks independently.
Battery Switch Prevents Battery Drain
The primary function of a battery switch in preventing battery drain is its ability to completely disconnect the house batteries from the trailer’s electrical system. When you’re not using your travel trailer, switching to the “off” position isolates the batteries, preventing parasitic drain from things like clocks, carbon monoxide detectors, or other low-power devices that draw current even when the trailer is turned off.
This ensures your batteries remain charged for your next trip. Leaving the switch in the “on” position, even for extended periods of storage, will lead to a gradual discharge of your batteries, requiring more frequent charging or even potentially damaging them.
Energy Consumption Comparison of Battery Switch Types
Different battery switch types have varying energy consumption profiles, though these differences are usually negligible. Simple manual switches have virtually no energy consumption. More sophisticated switches, like those with remote control or digital displays, may draw a small amount of power, usually in the milliamp range, to maintain their functionality. This power draw is typically insignificant compared to the energy used by the appliances in your trailer.
The impact on overall energy consumption is therefore minimal, and the convenience often outweighs this minor energy use.
Power Flow Through the Battery Switch
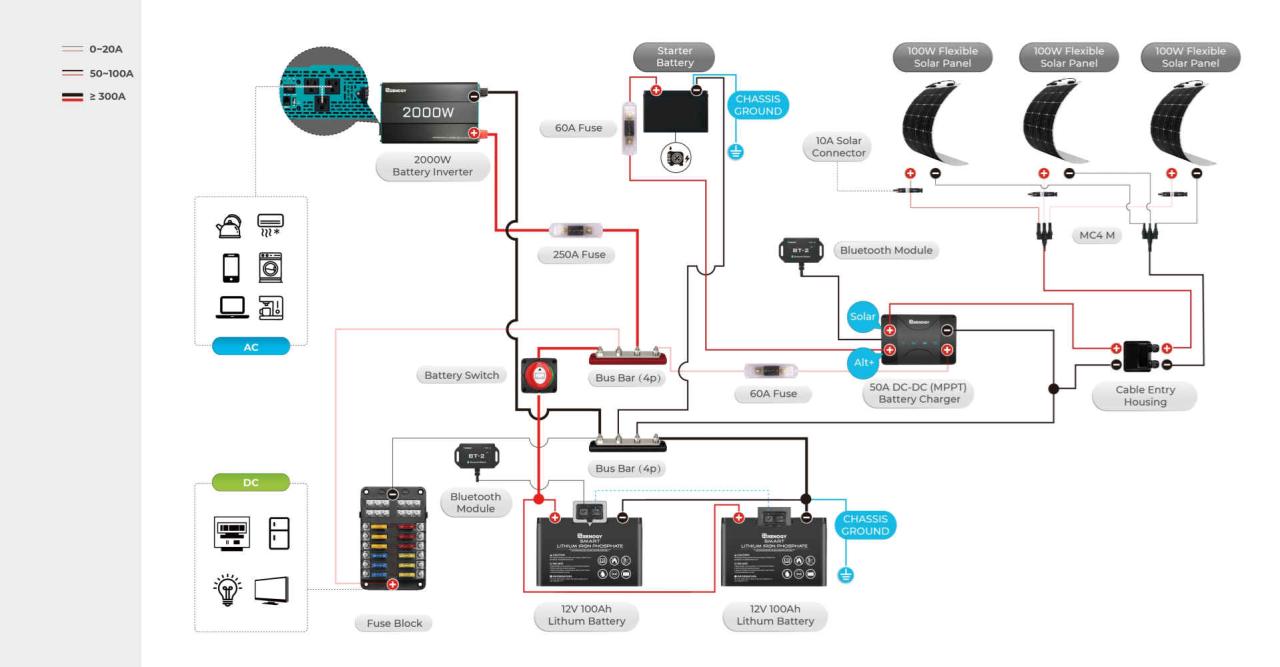
Imagine a diagram. At the top, we have your tow vehicle’s charging system (or shore power connection). From there, a wire leads to a battery charger, which then connects to your trailer’s battery bank (or banks, if you have two). This battery bank is connected to a battery switch. The battery switch then has multiple output points leading to various circuits in your trailer (lights, refrigerator, water pump, etc.).
When the battery switch is in the “on” position, power flows from the battery, through the switch, and to the various circuits. When the switch is “off,” the flow of power is interrupted, preventing any drain from the battery. A secondary pathway may exist for charging directly from the vehicle or shore power, bypassing the battery switch in some setups.
This ensures charging even with the switch off.
Mastering your travel trailer’s battery switch is a significant step towards confident RV ownership. By understanding its function, troubleshooting common issues, and performing regular maintenance, you can ensure a reliable power supply for all your onboard systems. Remember, safety is paramount when working with batteries and electricity, so always prioritize caution and consult a professional if needed. Happy travels!
Common Queries
What happens if my battery switch is faulty?
A faulty switch can lead to power outages, inability to charge batteries, or even damage to your electrical system. Symptoms include flickering lights, non-functioning appliances, and low battery voltage.
How often should I check my battery switch?
Regularly inspect your switch for corrosion, loose connections, and proper operation – at least once a season or before each trip is a good rule of thumb.
Can I replace my battery switch myself?
While possible, replacing a battery switch requires electrical knowledge and caution. If unsure, consult a qualified RV technician.
How do I know which type of battery switch I have?
Check the switch itself for markings or consult your RV’s wiring diagram. Common types include single-pole, double-pole, and those with auxiliary switches.
